Saturday, 28 February 2009

The Windows


Finally months after our initial enquiry, the windows are nearly ready to ship.  The story of how we came across this company was quite interesting.  We had a couple of quotes from local companies that had been recommended to us, and one was Custom Precision Joinery in Mold. 

Seperate to this we had also seen a recent barn conversion that we liked the windows.  They were a casement style, but had a nice profile to them, with a 'mullion' that gave the windows a different style, I enquired about who the manufacturer was, and it turns out to be Custom Precision Joinery, who we had a quote from.

CPJ re-worked our quote to design in the mullion, and we decided to go for hardwood, as the uplift over softwood was only around 15% in cost.  We also got them to prime the wood and apply one top coat.

Here are the windows all stacked up ready to be finished


The arched window below is actually around 2m high, and forms the large window in the hallway landing on the first floor


This is one of the obscure glass bathroom windows


I hope this was a good idea!  All the windows are spray painted, hopefully leaving us to just finish with a final coat on site.


The 'arch' for the main hallway window had to be hand made


Here you can see one of the front house windows being finished 


We have been very pleased with CPJ, they have kept us in touch all the way through, and made all the small adjustments we needed, such as the kitchen windows opening from the bottom rather than the side.

Roof now covered ready for tiles


The final roof covering is now on, and the roofer was just completing the last of the battens, ready to get the tiles laid.  Finally the House is covered from the top, and we are waiting for the delivery of the Windows and Doors, so the house can be made secure.

The Roofer reckons around 3 weeks to complete the Slate Tiles, they all have to individually checked and sorted into different thickness's ready to be put up.

Here is a shot from the front, where you can see the finshed roof.


Its hard to believe that there are 5200 slate tiles here, we eventually chose a slate called Carmen Ultra from Spain, it has a nice grain and thickness.  We saw them on another house and they look really nice.

This is inside the master bedroom, looking up you can see the roof is now completely covered.


Monday, 23 February 2009

Roof on and floor sections complete

The pictures are a little out of order here - this is the side view of the house.  Planning wouldnt allow us too much in teh way of windows, so there is a side entrance and window, then two smaller windows on the first floor which have to be obscure glass.


This is the living area, the hole in the wall is the fireplace, and we have opted for some wide casement style windows on the front of the house, you can see the where the windows will eventually go.


This is the view from the front - the roof is complete, the floors are now in, and the roofer is finishing the cover and battening so we can hopefully have a dry house, or at least from the top down.  The mild weather the last couple of weeks has been really great, and allowed us to crack on after all the snow that was slowing things down.

Here you can see the storage area at the top of the house.  We opted for creating a room rather than rafters and loft, the pile of wood in the front of the photo is the frame for the staircase, which will go in once the floor is complete.


and the back view, the rear windows have taken shape, and with the roof now battened the project seems to be moving on fairly quickly.  


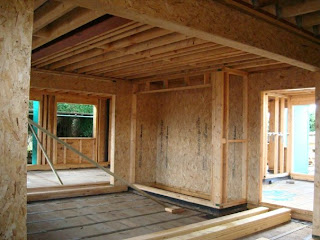
This is the inside just showing the rear living/kitchen area, the entrance to the left is going to be double doors and windows, the hole in the wall to the right is a second fireplace, and in the middle a further window.


Sunday, 22 February 2009

Inside the Timber Frame


Here you can see inside the rear of the building.  The whole back area is open plan, supported by a number of large RSJ's to take the weight.  The white timber is the Fascias being primed to put in place later in the week.


Roof and Joists in place


The frame got a little wet, as we were dodging showers, but not too bad.  You can see one of the very large glu lam beams at the top of the picture.  There are two of these supporting the roof, and they are extremely large and heavy!


Here you can see the crane lifting the roof trusses in place.  The crane was only on site for one day, and everything slotted into place as designed (Thankyou Neatwood Homes!)


Here Rob and Dave guide in place the roof trusses.

The font of the frame is starting to come together, and below is the large picture window that we have designed, that looks out over the front of the house.  It is around 2m high, so we hope it looks as good finished as it did on paper


Here you can see the internal timber frame, this is the area to the back of the house, with the staircase hold rail in the front of the picture


Finally the second floor is in place, and you can start to see things coming together... Neil (next door) is also starting on his build.


Tuesday, 17 February 2009


The next stage happens very quickly, up go the walls...


Very very muddy, but slowly getting there.  To prepare the site for this, tons of stone was laid around the house, so the crane and vehicles can get on and off OK, but the rest of the site is mud. Out of interest we removed around 20 wagons worth of soil to get the plot level and dig out the foundations.


This the view from the rear - and in a matter of days the frame really starts to take shape - the ground floor is complete, and the first floor panels are put in place.


You can see the rear windows taking shape.


The floor is also being built up, very quickly the complex wood structure inside is taking shape, and there are people swarming all over the structure, everyone concentrating on a particular part. It surprised us how quick this was done.


You can see the odd metal beam to support the large open space we have


Here you can see the inside starting to take shape


and the first floor panels slotting in from the front view


Timber arrives on site


Once the Timber is on site, then the actual jigsaw puzzle begins.  All levels have been checked at this stage to ensure everything is absolutely level or at least within 5cm, and the work begins.  This part took a couple of days before they were happy with everything, and then started the build.

Ice was a problem and we had to keep melting it down where the timber frame was going to be attached.  The Timber Framers were happy with the site and levels, which was a relief.


We missed the part where the wood was being unloaded, but here you can see one of the many many piles of Timber laying around on the site!


Scaffolding

Next up goes the scaffolding, which will be used to install the timber frame. It looks really strange just seeing this huge framework in place with nothing else.


As you can see we had some serious frost - so Clive spent a lot of time melting the ice on the key areas so that we could get the initial frame in place. All the Ibeams are in place and we are just waiting for delivery now of the frame. This is due on the 19th January, so everyone has been warned about the congestion as the crane arrives to offload the timber!


Sunday, 15 February 2009

Once the foundations have been laid, then the structure starts to take shape, here you can see the Ibeams being put in place on the left, whilst the flooring on the right needs to still be filled.


Now the old house has gone, the foundations go in. The ground had to be dug in another 12" to allow us to keep the roof height so we can get a storage area in the loft.

We had to get a soil check, and thankfully its good sandy soil with no clay, so we needed no special piling. The land is at a slope so it was wither a raised front, and level back or visa versa. As you can see the back of the house is dug in slightly.

We had some issue with the drainage, which is lesson number one, make sure the drainage exists when you buy a plot, of and also if it does exist that you can reach it with the correct drop.

Works out that the drainage we were meant to tie into couldnt be used, but the nearest other drainage point was too high, according to the Utilities plan. Anyway with a little insistence the Utilities guys came out and we lifted the lid on the drain, and found it was a meter deeper than shown on the plan, and also there was a run off going towards our land.

With a little more digging we found where the drainage point came into the land, and with luck on our side we then just had the correct drop to make it all work.


Finally we exhange contracts on the plot!


Its taken almost a year to sort out the PP, but we are now owners of a nice large plot, previously part of a single dwelling, which has now been split into 3 seperate plots.  We have the corner plot, and here you can see the origional House, a flat roof 60's design, and the garden area where we are building.

Rob Measuring out the plot

The side of the Plot

The rear of the plot - which will become the garden